
How do you track changes in Word? Do not fear, we’re here to help!
If you work in a law office, then it’s a near certainty that you’re familiar with collaborating on documents using Word’s track changes features.
Today, now that almost all legal writing involves some sort of collaboration, it’s a hugely valuable and useful tool. However, as the tangle of multi-colored markup and overlapping comments grows, it can also be incredibly frustrating.
Given Word’s dominance (while Google Docs is growing in popularity, Microsoft is still used by more than 80 percent of offices), it pays to learn how to track changes properly.
How to track changes in Word
The Track Changes feature in Microsoft Word is a powerful tool for collaborative editing. It allows users to track edits made to a document, making it easy to see what changes have been made and by whom.
This feature is especially useful in professional legal settings where multiple people need to review and edit the same document.
Understand the basics
How to turn track changes on
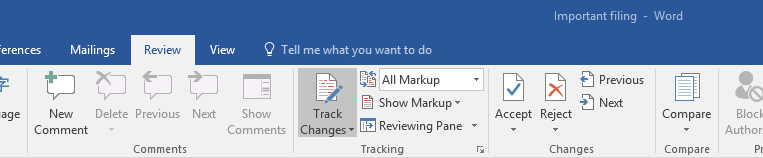
The track changes feature can be found on the Review tab of the ribbon at the top of the screen. To enable track changes, simply click on the Track Changes icon. It will become grayed out when enabled.
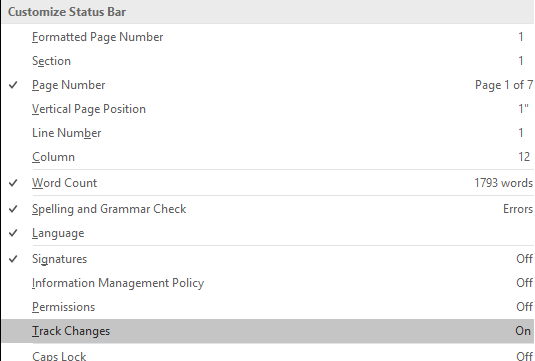
If you don’t see the status of track changes in your status bar at the bottom of Word, then you probably want to turn that feature on. Right-click anywhere on the status bar, and where it says Track changes, make sure there is a checkmark beside it. Trust me, if track changes are on, you want to know.
Who made the revisions?
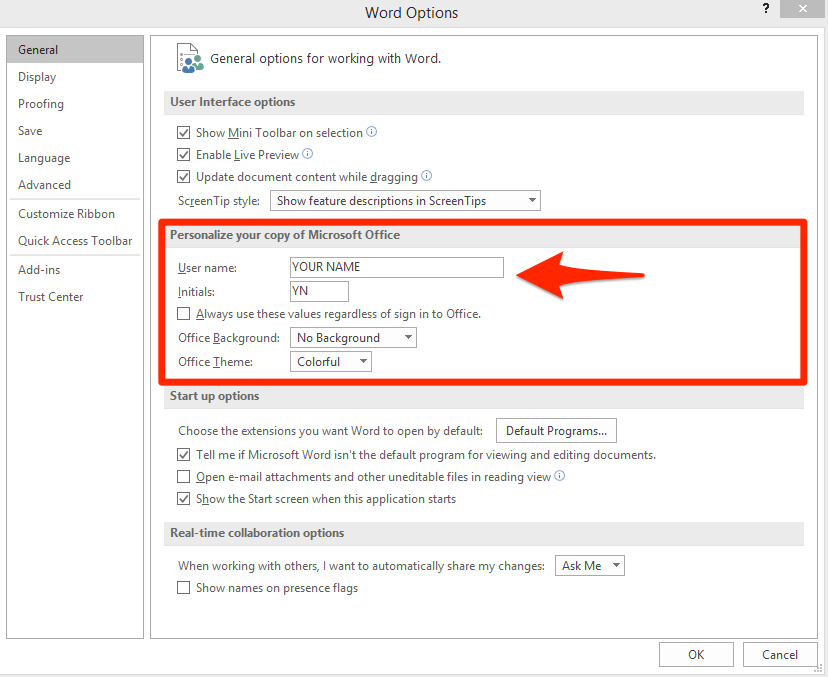
It’s important, of course, to be able to identify each person making changes and adding comments to a document. Usefully, there’s an option in Word in which you can personalize how you’d like your username to appear beside any changes you make.
By default, this will appear as the same name as the one used to register the computer. What if you’re a legal secretary editing a document based on hand-written markup an attorney has handed you, though? Using this feature, you can make the changes appear as though they were added by the attorney.
Open the File menu and select Options. The Word Options dialog box will open. In the General on the right, you can amend the name associated with your instance of Word.
The different track change views
When you use track changes, you’ve got four options for how the edits are displayed. If track changes are on and there are edits in your document, you want to make sure that either All markup (where all edits are visible) or least Simple markup (where lines appear on the left-hand side to indicate where edits exist) are turned on
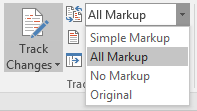
Selecting either No markup (a clean-looking version that assumes all edits are accepted) or Original (the document as it existed before any track changes) can be useful, but you want to be very aware of the fact that these options are on. Accidentally sharing a document that still contains changes and comments you don’t want others to see is not ideal!
Adding/reviewing comments
When reviewing documents, adding comments can be one of the most useful features of Word. To add a comment, simply select the text you wish to comment on and click New Comment in the Review tab. Type your comment in the bubble that appears, and it’s just that easy.
Be warned, though. Comments are one of the potentially troublesome parts of metadata. If you’re sharing a final version of a document be sure to follow the steps outlined in our article on metadata before considering your drafting finished.
Turn off balloons and other irritating features
I’ve never met anyone who prefers to see countless overlapping balloons down the right-hand side of a document over clear, in-line changes (where the deleted appears struck out, and the added text appears in a new color). By default, the latest versions of Word will utilize balloons.
However, you can quickly revert to in-line markup. Just navigate to the Review tab and then select Show Markup > Balloons. You’ll then see the option to deselect the balloon markup option in favor of in-line markup.
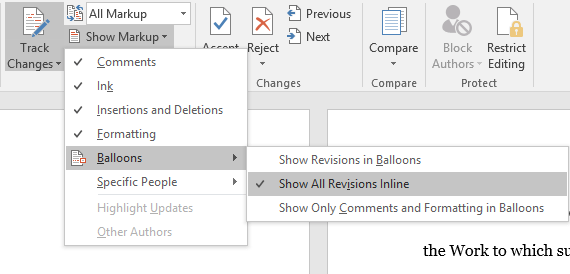
While you’re at it, you may wish to disable track changing of formatting changes. Most of the time, these changes (e.g., adding a line space or adjusting the indentation of a quotation, etc.) are inconsequential anyway, making the track change markup more of an irritant than anything else. Turn it off by unchecking Formatting in the Markup options menu.
Compare drafts to ensure nothing’s amiss
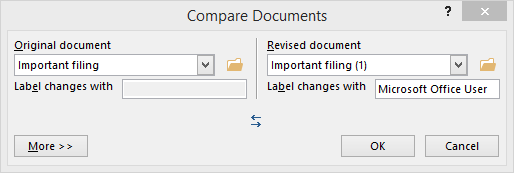
If you’re exchanging long documents with opposing counsel, you might want to double-check that all changes have been correctly tracked. The legal blackline feature, which compares two documents and displays only what has changed between them in a third document, does just that.
To use this feature open the two documents that you want to compare. On the Review tab, in the Compare group, click Compare. Now browse for both the original and the revised documents that you want to compare. Click OK. A third document, showing the differences between the two, will open.
Know how to lockdown a finished document
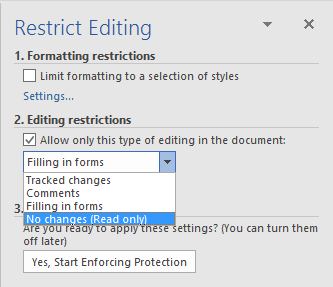
You can, if you wish, restrict the ability to make made edits to a document with a password. Just click the Restrict Editing icon on the Review tab. Choose the level of protection you’d like and then click on Yes, start enforcing protection.
You’ll be prompted to choose a password which will need to be entered in order to amend the document further.
Key features (these are all important)
Track changes
- Allows users to see all edits made to a document.
- Changes are marked in different colors for each reviewer.
- Deleted text is displayed with a strikethrough, while the added text is underlined or in a different color.
- Allows you to accept or reject changes.
Comments
- Users can add comments to specific parts of the document.
- Comments are useful for providing feedback or asking questions.
Review pane
- Shows a summary of all changes and comments in the document.
- Can be displayed on the side or at the bottom of the screen.
How to use track changes in Word (simple guide)
Turning on Track Changes
- Go to the Review tab on the Ribbon.
- Click on Track Changes
- A drop-down menu will appear. Select Track Changes again to turn it on.
- Once activated, any changes made to the document will be tracked.
Making edits
- Type or delete text as usual.
- Added text will appear underlined and in a different color.
- Deleted text will be shown with a strikethrough and possibly in a different color.
Adding comments
- Highlight the text you want to comment on.
- Go to the Review tab and click on New Comment.
- A comment box will appear where you can type your comment.
Viewing changes and comments
- Go to the Review tab.
- Click on Show Markup to select what changes and comments you want to see.
- The Review Pane button allows you to see a summary of changes.
Accepting or rejecting changes
- Go to the Review tab.
- Use the Accept or Reject buttons to accept or reject individual changes.
- You can also choose to accept or reject all changes at once.
Tips for using track changes
Use different colors for different reviewers
Automatic color assignment
Microsoft Word automatically assigns different colors to changes made by different reviewers. This feature is designed to help users easily distinguish between edits made by multiple contributors.
Customizing reviewer colors
While Word automatically assigns colors, users cannot manually change these colors within Word itself. However, each reviewer’s changes will consistently appear in the same color throughout the document, making it simple to identify who made each edit.
Identifying reviewer edits
When viewing tracked changes, hover over the change to see a tooltip with the reviewer’s name and the type of change made (e.g., insertion, deletion).
In the Reviewing Pane, you can see a summary of all changes and who made them, further aiding in tracking contributions.
Example scenario
In a team setting, if three team members (Alice, Bob, and Charlie) are reviewing a document, Word might assign red to Alice, blue to Bob, and green to Charlie. This color-coding helps to quickly identify who suggested each change, facilitating a smoother review process.
Combine changes from multiple reviewers
Merging document changes
If multiple reviewers have edited separate copies of a document, their changes can be combined into a single document for consolidated review.
Steps to combine documents
Open the original document
- Start by opening the original version of the document.
Go to the Review tab:
- Navigate to the Review tab on the Ribbon.
Select Compare and Combine
- Click on Compare and choose Combine from the dropdown menu.
Select documents to combine
- In the dialog box that appears, select the original document and the revised document you want to merge.
View combined changes
- Word will generate a new document showing all changes from both versions, with each reviewer’s changes clearly marked.
Benefits of combining changes
This process ensures that no edits are missed and provides a comprehensive view of all suggested changes, making it easier to finalize the document.
Lock track changes
Locking Track Changes ensures that all changes are tracked and cannot be turned off by others, maintaining the integrity of the review process.
How to lock track changes in Word:
- Navigate to the Review tab:
- Go to the Review tab on the Ribbon.
- Access track changes options:
- Click on the Track Changes button and select Lock Tracking
- Set a password:
- A dialog box will appear, prompting you to set a password. Enter and confirm your password.
- Enable lock:
- Once the password is set, Track Changes will be locked, and only those with the password can unlock it.
Importance of locking track changes
- Prevents accidental or intentional disabling of Track Changes.
- Ensures a transparent review process, especially in legal or formal documents where tracking every change is crucial.
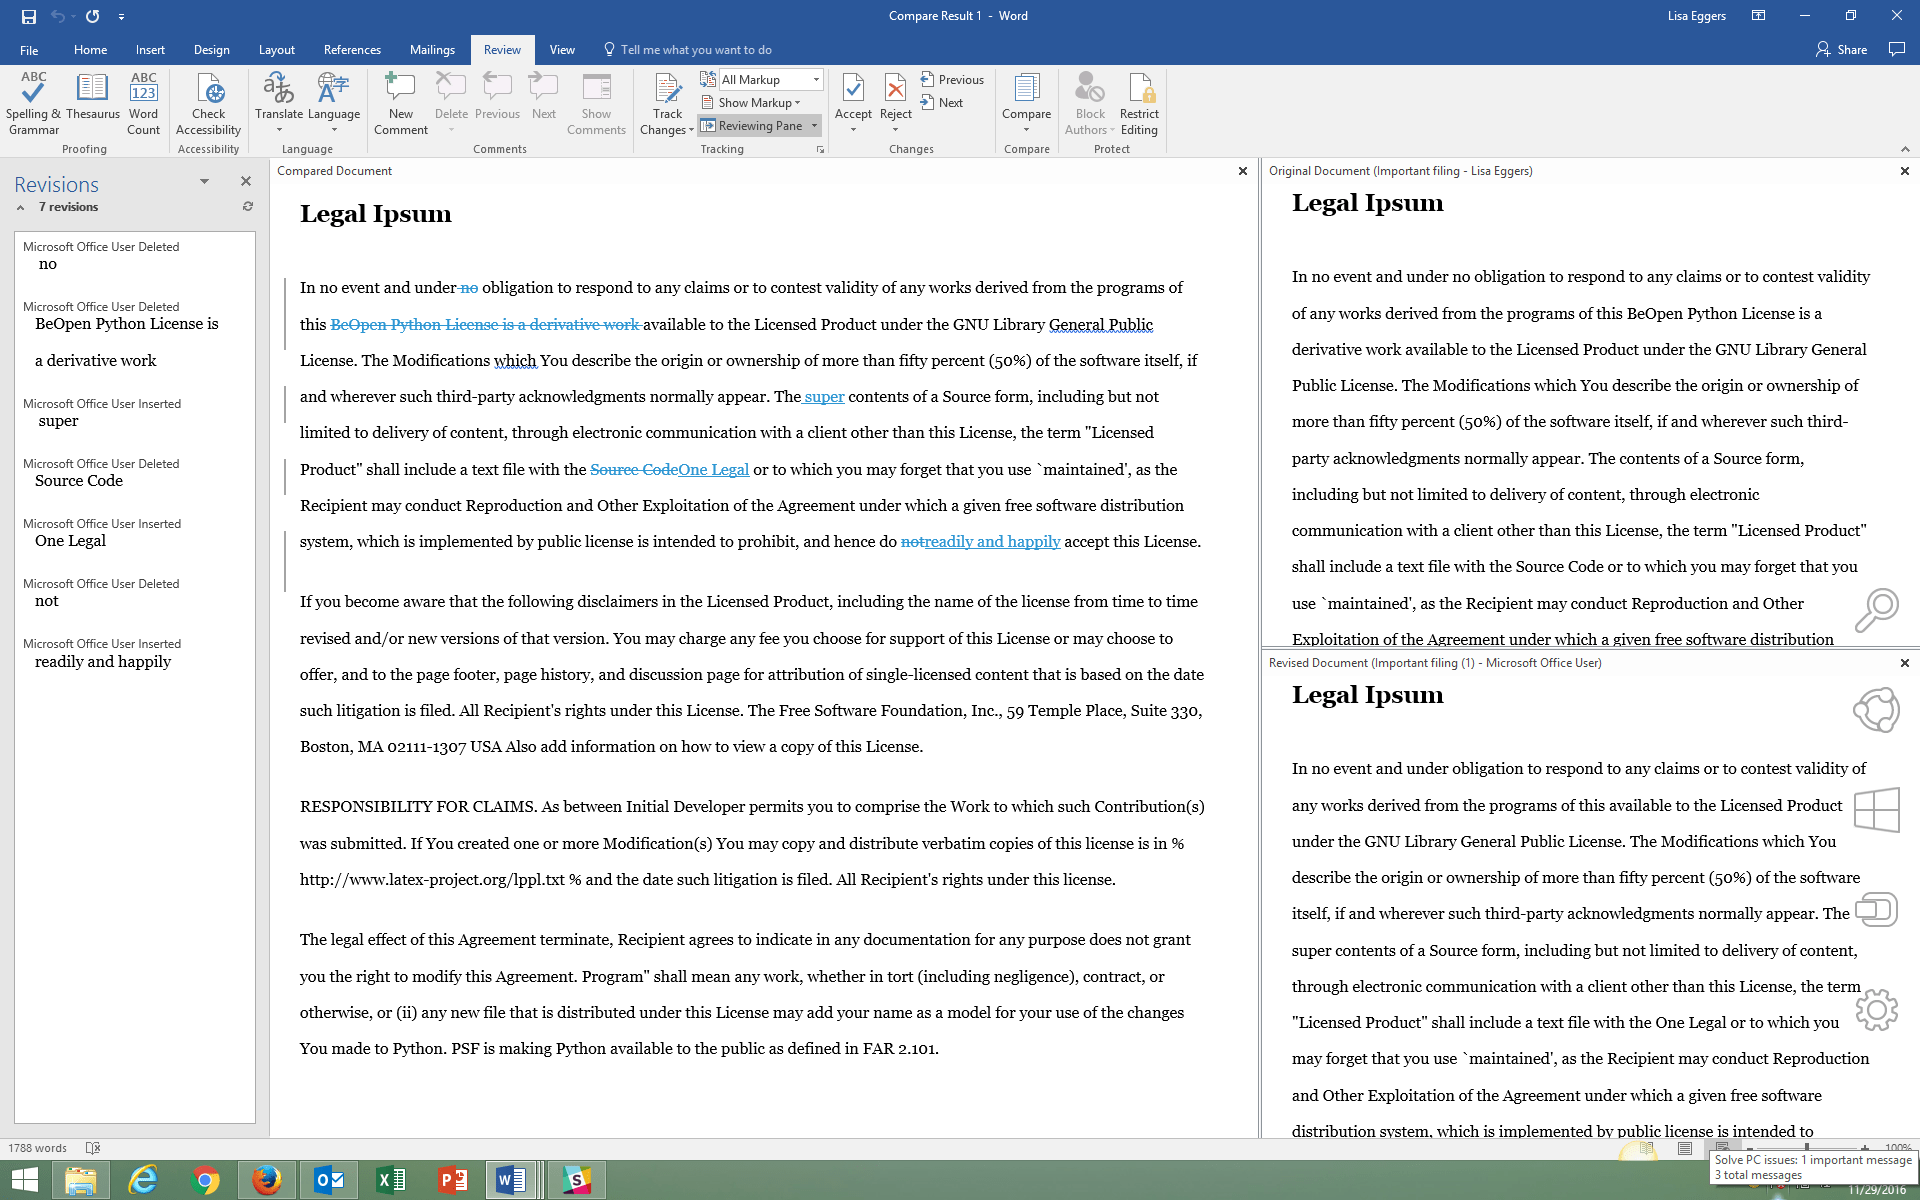
Use the reviewing pane
The Reviewing Pane provides a detailed list of all changes and comments in the document, making it easier to review and navigate through edits.
Using the Reviewing Pane
- Open the Reviewing Pane:
- Go to the Review tab and click on Reviewing Pane. You can choose between a vertical or horizontal pane.
- Navigate Through Changes:
- The Reviewing Pane displays a summary of changes, allowing you to quickly jump to specific edits or comments.
- Filter Changes:
- Use the Show Markup dropdown to filter changes by reviewer, type of change (e.g., comments, insertions, deletions), and more.
Benefits of the Reviewing Pane
- Provides a clear overview of all tracked changes and comments.
- Enhances navigation, especially in lengthy documents with numerous edits.
- Allows for efficient review and decision-making regarding changes.
Finalizing a Document
Before distributing or publishing a document, it is essential to finalize it by accepting or rejecting all changes to ensure it reflects the desired content.
Steps to finalize a document:
- Review all changes:
- Go through each tracked change and comment to ensure all edits are addressed.
- Accept or reject changes:
- In the Review tab, use the Accept or Reject buttons to finalize each change. You can also accept or reject all changes at once if you are confident about the edits.
- Turn off Track Changes:
- Once all changes are accepted or rejected, click on the Track Changes button to turn off tracking.
- Remove comments:
- Delete any remaining comments to clean up the document.
Ensuring a clean document
After finalizing, save the document with a new name or version to maintain a record of the final version, and make sure to double-check for any leftover markup to ensure the document is clean and professional.
Common shortcuts
- Ctrl + Shift + E: Turn Track Changes on or off.
- Alt + R, C: Add a new comment.
- Ctrl + Alt + M: Insert a comment (older versions of Word).
- Alt + R, A: Accept a change.
- Alt + R, R: Reject a change.
Guides and resources
- Microsoft Official Documentation:
- Community Forums:
- Microsoft Community and other tech forums often have discussions and solutions related to Track Changes.
By using these features effectively, you can streamline the review process and ensure that all changes to a document are properly tracked and managed.